Send Google Forms Notifications to Multiple Recipients
In this guide
Use Form Notifications by pipiform to send the right form response to the people who act on it. A fixed team inbox belongs in To; visible copies belong in CC; private copies belong in BCC. You can also map an Email question to send the respondent a copy.
This tutorial is published by pipiform, the maker of Form Notifications and Forms for Google Drive.
Install Form Notifications · View features and plans
This guide sets up a workshop enquiry workflow: the team handles the request, a coordinator sees the same details, and the respondent can receive an acknowledgement. The example addresses in the screenshots are placeholders—replace them with inboxes you control.
Decide whether everyone needs the same email
Before adding recipients, separate the jobs:
| Recipient | What they need | Suggested setup |
|---|---|---|
| Team that owns the request | Submitted details and action required | To |
| Coordinator following the same request | The same message and visible involvement | CC |
| An observer whose address should not be shown to other recipients | The same message | BCC |
| The person who completed the form | A receipt or next steps | Notify Form Respondent |
To, CC and BCC do not produce different messages. If staff need an assignment note and the respondent needs a friendly acknowledgement, create two notifications with different templates.
1. Create a team notification
In the desktop Google Forms editor, open Add-ons → Form Notifications for Google Forms™ → Open App. Choose Create → Email Notification and give it a name such as “Workshop enquiries — team.”
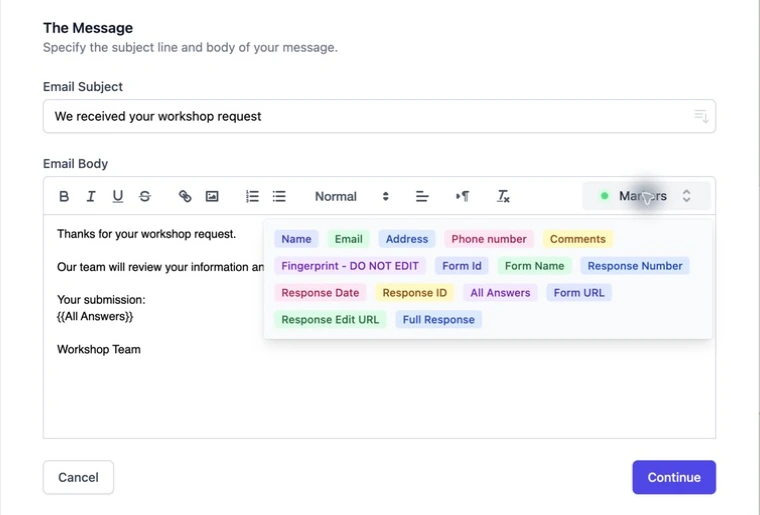
Write a subject such as “New workshop enquiry to review.” In the message, explain the action: “Please review this request and contact the respondent.” Insert All Answers or selected markers so the recipient has the information needed to act.
2. Enter To, CC and BCC recipients
Click Continue to open the recipient settings. Enter the main inbox in To, add a coordinator in CC, and use BCC only when a hidden copy is intended. Confirm that each entered address has been accepted by the control before moving on.
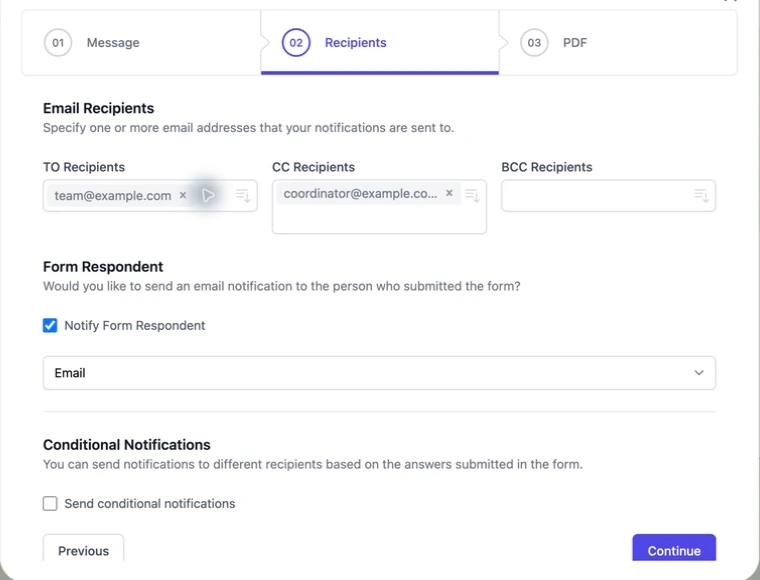
Start with a single owner inbox. Add other people only when they need every submission. If recipients depend on the answer, a conditional routing rule is a better fit than copying the entire team.
3. Add the respondent only when the template suits them
Enable Notify Form Respondent and select the form’s Email question to send to the address supplied with each response. Do not select Name or a general comments field.
A message copied to both staff and the respondent should be neutral: “We received the following workshop request.” For a private internal instruction such as “Assign this lead to a salesperson,” leave respondent delivery off and create a separate confirmation email.
4. Save and test recipients individually
Save the notification and submit fictional answers. Use test inboxes you can check. Inspect To and CC in the received message, confirm any intended BCC copy separately, and check that no unintended fixed address remains in the workflow.
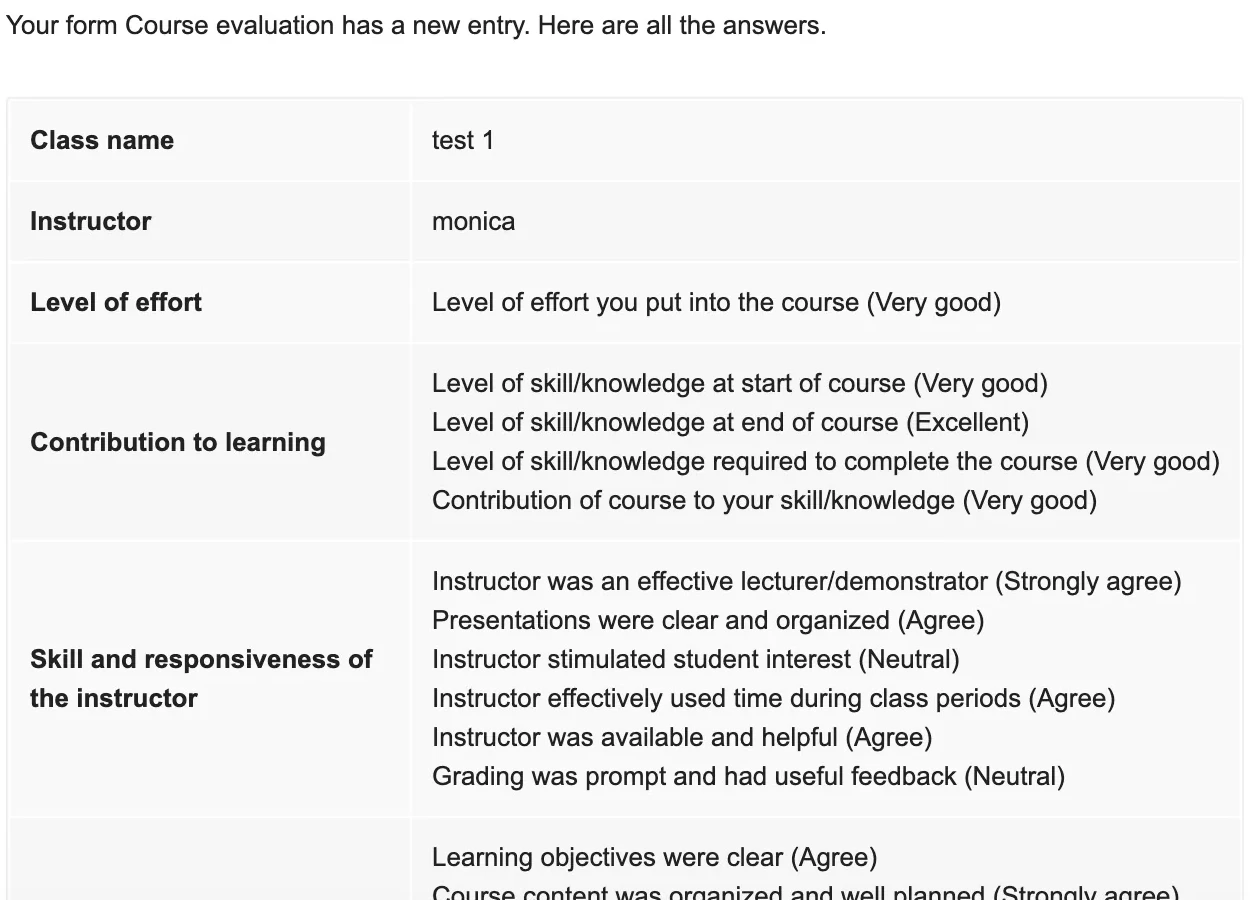
Our earlier tutorial test used one primary recipient and one CC address; the user supplied a received-message screenshot confirming delivery. That demonstrates a real delivery example, while your test confirms your own recipient list and account limits.
Make copies useful rather than noisy
A clear subject helps colleagues distinguish notifications from ordinary email. A short action sentence tells them who should respond. A full answer summary can save a trip back to Forms, but use individual fields if the submission contains information a recipient does not need.
For a growing team, route different requests to dedicated inboxes rather than adding every colleague to every message. Keep a general inbox for requests that do not match a condition.
What the built-in Google Forms alert does well
The native Get email notifications for new responses setting is a convenient simple alert for the user enabling it. pipiform provides a configured recipient workflow when you want To/CC/BCC, respondent mapping and your own message in one setup. Choose the simpler alert if it already meets your need.
Will BCC personalize each email?
No. BCC hides that recipient from other recipients; it does not create a different body. Use separate workflows for different content.
Can I notify a different person for each topic?
Yes, use answer-based rules in the conditional email tutorial. Test a matching and an unmatched answer before using the workflow publicly.
Why is someone receiving two messages?
Review overlapping workflows, fixed recipients, respondent mapping and any native alerts. Remove the duplicate route rather than repeatedly submitting the form.
Try it with your own form
Start with the inbox responsible for responding. Add a coordinator or respondent copy only after the message and recipient test are correct.
Install Form Notifications · Review the product and pricing
Form Notifications has a limited free mode of 20 emails per day. Check the current plan for recipient limits and paid options before using a large mailing workflow.
For managing forms and reviewing responses on iPhone or iPad, use the separate Forms for Google Drive app. It complements the desktop add-on workflow; an app subscription does not unlock the add-on. The app is US$59.99/year with a 3-day trial, subject to the offer in your App Store region. View the app on the App Store.