
Google Forms Timer Auto-Submit: What to Test First
A visible countdown does not prove that a response has been submitted. Pipiform’s Form Timer includes an auto-submit option, but you should verify the recorded response after the timer expires—especially when required questions, validation rules, or multiple sections are involved.
This guide explains where the setting lives and how to check the outcome before giving a timed form to participants. It focuses on submission behavior; use the desktop timer setup guide for the initial installation workflow.
Find the auto-submit setting
Open your form in the Google Forms editor on a computer. Click the puzzle-piece Add-ons button, choose Form Timer for Google Forms™, and click Open. In the Settings panel, look for the auto-submit checkbox below the allowed time.
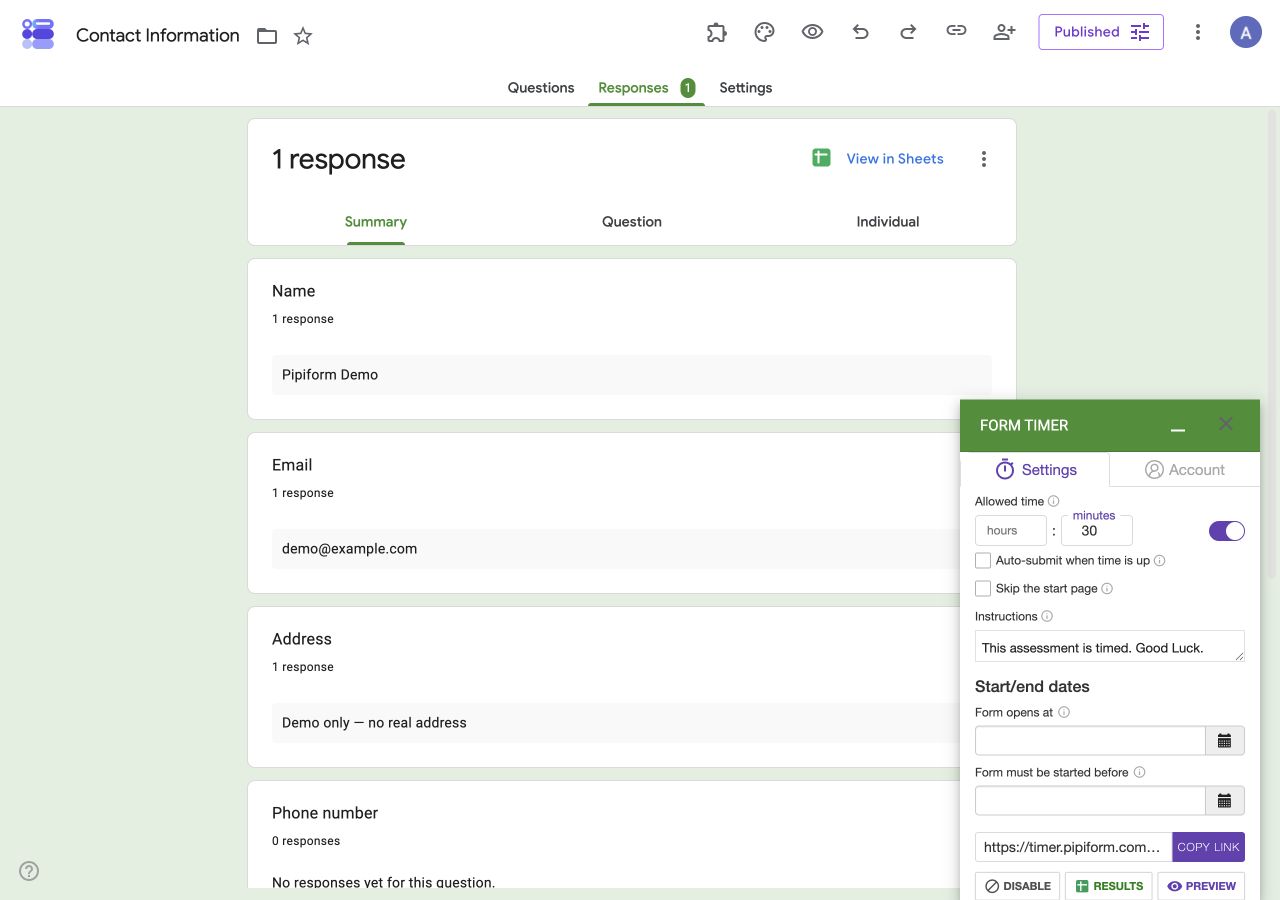
The same panel has a time allowance, instructions, date fields, and a link generated by the timer. These controls answer different questions:
| Control | Question to answer before sharing |
|---|---|
| Allowed time | How long should an individual attempt last? |
| Auto-submit | What should happen when that allowance runs out? |
| Form opens at | When should access begin? |
| Form must be started before | What is the latest permitted start time? |
| Copy Link | Which participant link belongs to this timed workflow? |
The “must be started before” label should not be presented to learners as a promise that every attempt will finish at that instant. If you need everyone finished by a common deadline, test that requirement separately from the per-person countdown.
Use the timer link for your test
A form editor link, an ordinary respondent link, and a timer-generated link are different entry points. Copy the link from the timer panel and put that same link in your test instructions. Otherwise, you may inspect one workflow while participants receive another.
Write a short instruction above the link: “Open this timed link, complete the questions, and check for a submission confirmation.” Include a contact route for problems. A timer is not, by itself, identity verification or a guarantee against cheating.
For an example of arranging the questions, see the timed practice quiz.
Test complete and incomplete answers separately
Use a disposable copy of the form and a short allowance that the add-on accepts. Keep the question types and section structure you plan to use. A simplified form may hide the problem you need to catch.
Run the following checks with distinctive fictional answers, such as “Expiry test A,” so each record is easy to identify:
| Test | Participant action | Evidence to inspect afterward |
|---|---|---|
| Manual submission | Complete all questions and submit before expiry | A matching response in the form’s Responses tab |
| Expiry with valid answers | Complete the form, then let time run out | Confirmation behavior, response count, and saved answers |
| Required answer missing | Leave one required question blank | Any validation message and whether a response exists |
| Invalid answer | Enter a value that breaks a configured rule | Whether the error is shown and what is recorded |
| Multiple sections | Let time expire before reaching the final section | Whether earlier answers and the attempt are recorded |
Google documents that missing required answers or unresolved validation errors can prevent moving forward or submitting a form. That makes them essential test cases; it does not establish how every timer add-on handles expiry. See Google’s form submission troubleshooting.
Do not infer success from a countdown reaching zero, a closed tab, or a thank-you message alone. Open Responses, locate the matching test entry, and compare its actual answers with what you entered. If a result is missing, preserve the test conditions before changing several settings at once.
Decide whether questions should be required
“Required” is useful for information you must have, such as a registration identifier. For practice questions, decide whether an unanswered item should be accepted as blank or prevent submission. That is an assessment decision, not just a timer setting.
Avoid making every question optional simply to work around an unexplained expiry problem. Instead, test the intended design and tell participants how incomplete attempts will be handled. If you cannot verify reliable expiry behavior, require manual submission before the deadline and provide a clear recovery process.
What we actually verified
In the authorized Contact Information test form, we observed a live countdown and successfully submitted a fictional response manually before the limit. The response appeared in the Google Forms backend. We also observed required-field validation. The fresh screenshot above records the English desktop settings on September 14, 2026.
We have not verified auto-submission at expiry, background-tab behavior, or submission after a connection interruption. The table is a testing procedure, not a claim that these cases passed. Different question designs deserve their own test results.
Frequently asked questions
Does enabling auto-submit guarantee that every answer is saved?
Treat it as a setting to verify with your own form. Check the stored response after expiry, including cases with incomplete or invalid answers.
Can I use the ordinary Google Forms link?
For a Pipiform timed workflow, distribute the timer-generated participant link. Keep the editor link for the form’s creators.
Is an opening or closing date the same as a countdown?
No. A date sets a point on the calendar; a countdown represents an attempt’s time allowance. Test both if your assessment needs both.
Do I need to test every possible browser?
Start with the devices and browsers your participants will actually use. Include a phone if mobile participation is expected, and do not describe a desktop-only test as mobile verification.
Where can I find the timer add-on?
The Pipiform Form Timer overview links to its installation page. If the installed add-on is missing from the editor, follow the add-on troubleshooting guide.